And thus I decided to become a MOUSE!
I already had the grey dress. I just needed the ears. (I opted out of the tail because it could be a hassle and I didn't want to look like a rat.) I looked at Target, the Dollar Store, and Walmart. None of them had a cute ear set, so I decided to make some ears.
Materials
- 1 piece of grey felt (shade to match the dress) and 1 piece of pink felt
- 1 piece of cardboard
- 1 circle (you will use this to create the size of your eyes)
- grey string and a needle
- scissors
- marker
- bobby pins (6)
How to:
Cut out 2 small squares from the pink felt, roughly the same size as your circles. These will be the pink insides of your ears. Fold one square in half. Draw a half heart. Then cut along the line. Unfold and you will have a heart. It doesn't have to be perfect, just however you want it. Use that first heart to trace a matching second heart.


Double check that your hearts fit inside your circles.
Now we will focus on the ears. Face your piece of grey felt face down if it has texture like mine did; this will hide your drawing marks. Place down one circle onto the felt (textured side down). You will want to draw around the circle. Leave a 1/4 inch space between your cardboard circle and the line; this space will allow for your stitching. Then you will draw an added 1 1/2 inch of rectangle at the bottom. This will form the loop for your bobby pin to go into. Cut out your drawing. Use it to trace 1 more. These two version will be the front flaps of your ears. Then flip over your drawings and trace twice more; these will be the backs of your ears. This will make sure your ears match. Cut out the remaining drawings. Then line everything up.
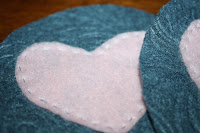
I then hand stitched a pink heart onto the front panel of each ear. Since this is a front panel you want to be sewing directly onto your textured side. (I liked the hand stitched look and could do this while watching tv. Using a sewing machine this project would take less than ten minutes.)
Then line up your ears, one at a time: front panel, cardboard circle (sturdiness), then back panel (textured side facing out). Start on one end and stitch all the way around. Place in a bobby pin to allow enough room in your loop. Stitch the end of your panel up to the top (over the bobby pin), thus creating a loop. Continue for the second ear. (I used bobby pins because I don't like headbands, but you could usually slip the loops onto a headband for a youngster.)
Your ears are complete! (Use more bobby pins to secure them in place.)
Here's what they look like on:
Happy costume creating!


