I've hosted a few people over recently and it became (painfully) obvious that I don't have enough seating. Guess a love seat doesn't cut it for more than 2 small people. A few years ago I visited the super chic @mollytics new (then) place and she had 2 beautifully reupholstered chairs in her living room.
I've been wanting to try reupholstering for a while but am scared of a big projects. Chairs seemed feasible with my limited furniture skills and would give me a little more seating. This would also be a chance to add some character to my living room which was in serious need up a facelift!So I started scanning Craigslist for free chairs...and found nothing. Then one day I came home from work and found this by the dumpster:
I loved the design on the back of the chair. There was only one chair, but it seemed like a good start. How hard can this be right? ha!
I started by removing the seat. It had a few old screws holding it in place but was easy to take off.
Now here come the "easy" part...the sanding. I found sandpaper that was made for removing old paint, so it was a little more coarse than a standard paper. I started sanding...and sanding...and sanding... I wanted to get as much of the old paint off as possible. The sanding also allowed me to smooth out a few chips in the chair. Then (as I had learned via Pinterest) I washed the chair down with soap and water.
While the chair dried, I moved onto the seat. It looked to be in good shape but I didn't like the fabric which smelled like the previous owner's home...
I started by removing the staples holding the fabric into place. This took a while as I had to be careful (it's been a while since I've had a tetanus shot). To my surprise this chair was about to get it's second makeover! Underneath the first layer of fabric was the original fabric.
Once the old fabric was removed, I replaced the old batting and cushion with fresh ones. Then I wrapped my new fabric over that and began stapling it into place, making sure to pull it tight.
Here's what the seat looks like:
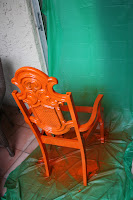
Once the chair was dry it was time to start spraying paint. Easy! right? Well it is pretty easy but a few lessons learned: 1. don't over spray at too close of a range or the paint will bubble, 2. the mist of the spray flies so put down way more tarp all around (see orange colored patio tiles in picture below), and 3. follow the instructions for 48 hours to dry (I followed that rule!).
Spray painting took a few days because I waited the 48 hours (per the can's instructions) in between for it to dry and really wanted to make sure that I got all of the nooks and crannies in the chair's design.
By Saturday the chair was dry and it was time to put everything together. Here's the finished result compared to the original:
I am really happy with the finished result! During the drying time I had been working on pillows for the couch which coordinate with the chair. Once the full living room is complete I will post a picture. If you're interested in redoing a chair I strongly encourage it. It was fun and easy!


Looks AMAZING! good job :)
ReplyDelete